Beginner's Guide to Setting Up and Using a Brother Sewing Machine
Congratulations if you just bought a Brother sewing machine as your first sewing machine! They work great for novice sewers. It's possible that you've already visited your local fabric store and stocked up on beautiful fabric for all the projects you want to do. Even while it's all fascinating, you're probably not even sitting down to think about how to set up and use a Brother machine just yet.
Due to its ease of use, Brother sewing machines aid several novice sewers in learning how to sew. How to thread, turn on, and start sewing are all clearly outlined in the sewing machine's handbook and on-machine illustrations. A beginner will also benefit from knowing how each component of the machine works before using it.
How to Setup a Brother Sewing Machine (10 mins video)
Chapters
How to Setup a Brother Sewing Machine (text)
If you bought a used Brother machine, don’t worry! You can usually find the manuals online for free on the manufacturer’s website.
What Else Do You Need
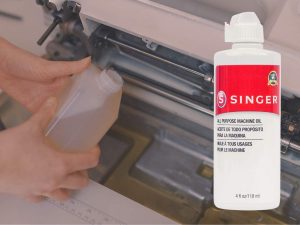
Before you can set up your sewing machine, you must have a spool of thread ready to go. A soft towel and a pair of scissors are also helpful to have on hand for cleaning the machine.
In order to learn using your machine without wasting nice fabric, you might want to find some undesirable fabric. New machines frequently come with a scrap of fabric.
Bobbin winding
Before you can begin sewing, you must wound part of your thread onto a bobbin, unless you purchase preloaded bobbins. To ensure that your thread and bobbin thread match perfectly, you should wind your own bobbins the majority of the time.
The user's manual for Brother machines is printed with simple diagrams. You only need to adhere to the numbered diagram.
Your thread spool should be placed on the spool pin and secured there with the holder. Following the order of the numbers supplied to each holder in the handbook, wrap the thread through the three holders on top of your machines.
This secures the thread's loose end to the upright pin on the machine's upper right side. Place the bobbin there and wrap the loose end around the bobbin's center a few times after passing it through one of its holes.
The bobbin pin will then be moved to the right, securing it in place. By doing this, your machine switches from sewing mode to bobbin mode.
The only other step is to press down on the pedal for a moment and watch as the machine fills the bobbin with thread.
Install The Bobbin
A bobbin on some machines can be loaded from the front or the side. Some also have a tiny casing where the bobbin slots in. To accurately load your bobbin with thread, refer to the manual's illustration instructions.
Before you start stitching, be sure to leave a few inches of thread free. To raise and lower the needle once, use the manual needle control, which is often found on the machine's back. As a result, there will be two loose thread ends close to the presser foot because the bobbin thread will be carried up with the needle thread.
Thread the Needle
Your thread spool needs to be inserted onto the spool pin at the top of your machine before you can thread the needle. At the end of the spool pin, attach the spool holder like a cap. This prevents the thread spool from escaping as you stitch!
Then, unwind around ten inches of thread, and weave the thread through the thread route by either following the graphic in the manual or the numbers printed on the machine. In the majority of Brother models, the thread is wound over the second thread guide after being looped over the first thread guide and the tension knob.
Adjust Settings
Your sewing machine's remaining options let you choose your chosen stitch pattern and modify the tension as you go.
You should most likely begin with a straight stitch. On a scrap piece of fabric, you can experiment with changing the tension settings to see what happens.
How to Use a Brother Sewing Machine - checklist
-
Plugin your machine and turn it on
-
Wind the bobbin
-
Thread the needle (remember to follow the thread path!)
-
Adjust the tension settings as necessary
-
Insert the fabric
Insert the fabric beneath the presser foot, and press the lever to lower the foot onto the fabric
-
Press down on the foot pedal
This will start the motor running and move the needle up and down at the same time as the machine feeds the fabric through the area beneath the needle
In the end, you can use the same sewing machine to sew very basic or more complex designs. You should generally start with a straightforward project if you're just getting started. You can learn how your machine functions by sewing a circular skirt, a pillowcase, or a rectangular curtain panel, all of which include numerous straight seams.
Brother Sewing Machine Models For Beginners
Brother has a solid reputation for making affordable sewing machines for novice sewers.
Even entry-level machines today include a variety of stitch settings and presser foot attachments. However, keep in mind that for your first machine, you may not require every unique function available.
What features should your first machine have? Most likely, you should begin with a reasonably priced model. As you gain more sewing knowledge, you can focus on the qualities that are most important to you and choose your next machine appropriately.
To avoid becoming overly overwhelmed when you first start, it's a good idea to master the fundamentals on a less complicated machine. The good news is that several inexpensive Brother machines are available for between $80-$200.
Brother CS5055
A real Amazon review
"This is an excellent machine for beginners and advanced users. I bought it for my mom but I had to learn about how to use it to show her as she was intimidated by the technical aspects of it. The lcd and push buttons. Her old machine was also a Brother machine she had forever which was all manual.
I don’t know much about sawing so while the instructions are decently written I am not familiar with the terminology. Having said that I did find the machine easy to setup and easy to use. I tried a few runs on my own which resulted in a few laughs from my mom due to newbie mistakes but I soon got the hang of it the last few runs were almost perfect. I was then able to show my mom how to use it and she loved it. After I show her how to set it up and how to select stitch type, length and width and tried a few runs with different stitches and such she made the comment that is better and easier than her old machine. One thing she really liked is that when you select a stitch the lcd tells you what foot to use for it. Don’t know what that means but I trust she knows what she is talking about. One thing she did mentioned she didn’t like is that when the machine stops it leaves the needle down. She would prefer the needle up position. The manual doesn’t make a reference to needle up or needle down but a quick google search found a link to the brothers FAQ website and in there they tell you how to change this setting. Very complicated. Power machine off, then press and hold the minus button for the first digit of the stitch type while you turn the power on. That’s it. Mom is very happy with it now. 🙂
This machine is also slightly lighter than my mom’s old machine. Which she also appreciated as she is getting older. So for her lighter is better.
One thing I noticed while setting it up, and mom noticed it as well, is that the bobbing (sp ?) reel is top loading and not side loading like her old machine. There is a transparent piece of plastic that is removable to put the reel in the machine. This plastic piece goes into a larger non-transparent plastic that is removable. I assume the larger plastic is for cleaning and oiling the machine. These two pieces of plastic are thin and have little tabs that hold them in place. To me, from previous experience with similar items with little tabs, they seem flimsy and the tabs could easily break. I suggest to be very careful when removing them and also very gentle when putting them back.

Brother XM2701
This Brother machine is perfect for multiple everyday sewing projects. Featuring a full range of user-friendly features and a lightweight design, the Brother XM2701 is perfect for beginners who are learning to sew and more advanced sewers who are looking for versatility.
The Brother XM2701 sewing machine offers 27 built-in stitches including blind hem, decorative, and quilting stitches with an automatic one-step buttonholer for virtually perfect buttonholes. The XM2701 has been engineered for easy use, featuring 6 quick-change sewing feet, including buttonhole, zipper, zigzag, narrow hemmer, blind stitch, and button sewing feet. Users will enjoy the ease of sewing cuffs, sleeves, and pant legs with the built-in free arm.
Designed for a broad range of users, the XM2701 also comes with a built-in easy needle threader, a jam-resistant Quick-Set top drop-in bobbin, and an automatic bobbin winding system. This affordable Brother machine is backed by a 25-year limited warranty along with online technical support for the life of the produc